Git
What is git?
![]() Git is a Distributed Version Control System (DVCS).
The main difference with VCS is its distributed form, which means that
there is not a single repository centralizing all the code history.
Git is a Distributed Version Control System (DVCS).
The main difference with VCS is its distributed form, which means that
there is not a single repository centralizing all the code history.
All the code history is in each repository, which
means that you have all the history in your local repository as well as in the others.
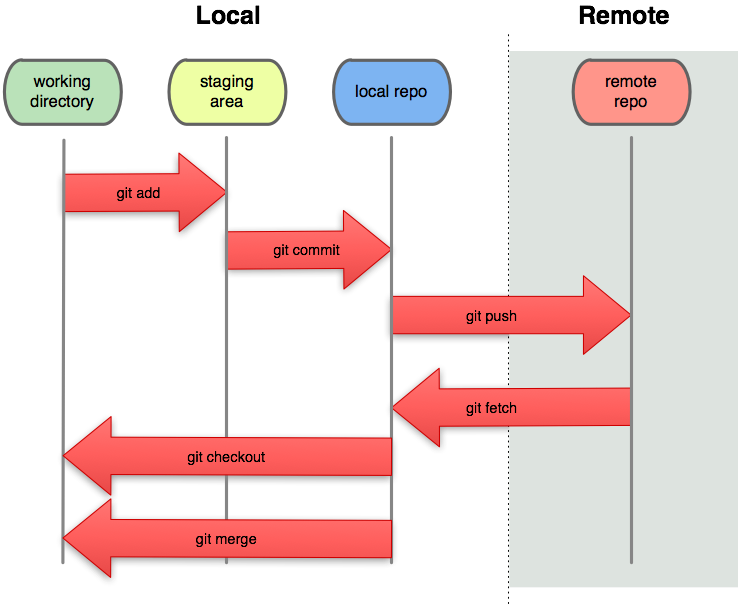
Git works like the following figure:
- you add new or modified files and remove deleted files to your staging repository.
- when all your changes make sense you commit them to your local repository.
- now, you can share your modifications whith the rest of the world by pushing them to a remote repository.
- to get others' modifications pull or fetch them from a remote repository.
For more information how to use Git, please visit the Git Reference web site.
Why Git?
Silverpeas is a free and libre project that values meritocracy.
In code we believe!
As we switched to the Git distributed source control system, we heavily blured the distinction between official project developers and external contributors.
This makes it easier for you to:
- prepare changes, and for us to eventually merge them
- maintain your own private modifications of Silverpeas
- later split your own modifications and submit them back to us.
Github
![]() Silverpeas's code is hosted on public Git repositories on GitHub, so that everybody can participate and contribute to the Silverpeas project.
Silverpeas's code is hosted on public Git repositories on GitHub, so that everybody can participate and contribute to the Silverpeas project.
The Github features enhance the capabilities of a collaborative and distributed work.
How to contribute
Forking Silverpeas
First, you have to create your account on Github, then fork the Silverpeas repositories you are interested in.
For information, Silverpeas is made up of the following projects, each of them with their own Git repository:
Silverpeas Dependenciesthat is a global descriptor defining all the dependencies with their version and their scope required to build and to run Silverpeas. Usually, you won't have to modify this project.Silverpeas Test Dependenciesthat is a global descriptor defining all the dependencies with their version required to run the unit and integrations tests. Usually, you won't have to modify this project.Silverpeas Projectthat is a global descriptor for many of the Silverpeas projects: it imports the descriptors above and defines plugins and profiles to build Silverpeas according to different contexts. Usually, you won't have to modify this project.Silverpeas Corein which are defined the Core APIs of Silverpeas for both the business part and the Web part.Silverpeas Componentsthat comprise all of the applications provided by Silverpeas (DEM, gallery, blog, ...)Silverpeas Assemblyis a project that declares all the components that made up the Silverpeas collaborative platform and that defines the rules to build from them the final Silverpeas application, ready to be deployed into a JEE runtime.
Once the fork completed, clone it:
git clone URL_OF_THE_FORK
Your fork is then referenced by your git configuration with the name origin
In order to keep your fork up-to-date, you will have to pull modifications from the Silverpeas repository. Thus, you
have to add a remote repository to your git configuration linking your local repository to the Silverpeas one. The
recommended name (used afterwards in he documentation) is
silverpeas.
To add a remote repository to your local, execute the following command:
git remote add silverpeas URL_OF_SILVERPEAS_REPOSITORY
For example:
git remote add silverpeas git@github.com:Silverpeas/Silverpeas-Core.git
To synchronize your local repository with Silverpeas, we recommend to execute the following command:
git pull --rebase silverpeas master
Or to be less confusing by unexpected merge conflicts, you can divide the synchronization in two steps:
git fetch silverpeas master
git rebase FETCH_HEAD
The rebase operation while synchronizing your local repository with Silverpeas is to ensure
your changes will be on top of the fetched modifications and hence they won't be mixed with external commits.
By doing this, when we'll merge your changes, the history of Silverpeas changes will be clean and understandable.
Build Silverpeas
We use the Java Development Kit 11 (Oracle JDK or OpenJDK 11)
and the maven build tool to manage the build life-cycle of our projects. With Maven,
a project is described by a POM (Project Object Model) that is defined in the pom.xml file at the root of the
project. Maven provides at least the following features:
- a predefined directories layout for both sources code and build results,
- a build workflow in which each stages are well defined,
- a dependency management by using both a local and a remote repository in which the dependencies (named artifacts) are available.
Before building your copy of a Silverpeas project, you have to define some settings to Maven like indicating
our own Maven repository. For doing, please edit a file settings.xml
in the .m2 directory at your home folder and add the following lines:
<?xml version="1.0" encoding="UTF-8"?>
<settings xmlns="http://maven.apache.org/SETTINGS/1.0.0"
          xmlns:xsi="http://www.w3.org/2001/XMLSchema-instance"
          xsi:schemaLocation="http://maven.apache.org/SETTINGS/1.0.0
                      https://maven.apache.org/xsd/settings-1.0.0.xsd">
  <mirrors>
    <mirror>
      <id>silverpeas</id>
      <mirrorOf>*</mirrorOf>
      <url>https://www.silverpeas.org/nexus/content/groups/silverpeas/</url>
    </mirror>
  </mirrors>


</settings>
Once done, you are ready to build the project:
mvn clean install
or without running the tests:
mvn clean install -Dmaven.test.skip=true
In order to build the Silverpeas application,
you have to build first Silverpeas-Core and then Silverpeas-Components.
If you have modified silverpeas-dependencies-bom, silverpeas-test-dependencies-bom,
Silverpeas-Project, you have to compile first this project before anything.
In the case you have added a new application, you can reference it into the POM
of the Silverpeas-Assembly project.
Installing and testing your codes
Beside the unit and integration tests, you can test functionally your code in Silverpeas by installing it with your changes.
The project Silverpeas-Distribution is the source code to generate the
Silverpeas installation archives for both Windows and Unix-like systems. You can also build it
by executing the following command:
mvn clean package
and the archives will be generated into the target directory of the project.
Then just extract it, set correctly the environment variables SILVERPEAS_HOME
and JBOSS_HOME and follows the instructions in the
Silverpeas installation page.
Once done, you are ready to run Silverpeas either in debugging mode or in a normal mode
to test it. For doing, go to the folder SILVERPEAS_HOME/bin directory and then:
./silverpeas clean install
to clean any previous installation of Silverpeas and install your own changes,
./silverpeas start
to run Silverpeas in normal mode,
./silverpeas debug
to run Silverpeas in debugging mode,
./silverpeas stop
to stop Silverpeas.
Creating a development branch
Now that you have your own repository, let's create a branch to develop some code in it. The branch name should reflect the development feature or bug you are working on. It exists two main ways to handle the local and remote branchs with Gits.
The first approach is to create the branch in local, then pushes it to the fork and sets the local branch to track the remote one:
git branch BRANCH_NAME
git push origin BRANCH_NAME
git branch --set-upstream BRANCH_NAME origin/BRANCH_NAME
The second approach is to create the branch in your fork, then creates from it a local branch that will also track it:
git push origin master:refs/heads/BRANCH_NAME
git branch --track BRANCH_NAME origin/BRANCH_NAME
or to create remotely a branch from another one:
git push origin EXISTING_BRANCH:refs/heads/BRANCH_NAME
git branch --track BRANCH_NAME origin/BRANCH_NAME
Now you can switch your working directory to the branch you have created (id est checkout the branch):
git checkout BRANCH_NAME
When all your modifications are commited, it is time to push them to your remote branch.
git push
Integrating your changes in Silverpeas
Now that your development is ended, you may want to integrate it into Silverpeas.
To do this we take advantage of
Github's "Pull Request" feature.
On receiving your pull request, the Silverpeas core team will look into it and may give you some remarks.
When your code is accepted it will be merged into Silverpeas master branch and you will be informed of this.
Don't forget to synchronize both your repository and your fork with Silverpeas's in order to be up to date. We'll be pleased that you do it before any pull requests.
git checkout master
git pull silverpeas master
git push
Your development branches for the integrated code are now obsolete, so you may want to delete them.
git push origin :BRANCH_NAME
git branch -D BRANCH_NAME